Thursday, November 3, 2011

Making the best of the last days of summer... er fall?

Once we had gotten the patio to the point where we wanted it, we still had one big area left. The area(we believe) that will sell the house for us which is the Laundry room. We have been working hard to transform it from a dark, wet room that had a shower in it as well that really was nasty and gross; to a room that a person would actually want to do laundry in. We mangled the washer dryer in a year ago, and we created the great use of the space below the stairs that was more useful that the paneling that was there.

We had one small issue with the cabinet. Apparently we had put too much weight into it and it had caused the bottom of the cabinet to sag down. We had to fix that first, so of you have a cabinet like this with the particle board bottoms, make sure you don’t over fill them or that you reinforce the bottom to keep it from sagging.

I had said a few weeks ago we had plans for storage in the laundry room for some items and using more space effectively. Well here is what we came up with, it was very simple to put together and well worth the effort. We got some more of the Birch plywood from Menards that was on sale for $22 a sheet (which is a really good deal!) and cut it into sections that were to make 4 boxes about 20 wide and 17 high and 24 deep( the same depth as a regular countertop) we built it all outside and made it very similar to the construction of a kitchen cabinet. This way we would be able to put a counter-top on it and it would be a very good fit.

After a coat of really good primer, we put 2 coats of a nice semi-gloss paint and then let it dry up. It was wide enough to fit a standard laundry basket in it, as well as it was deep enough you can fit a long basket in and it would not stick out too bad. We then went to Menards and got one of their 4’ countertops that was 25 bucks and brought that home and cut it to fit on top.

One other thing that may be noticed, is that we included the utility sink in the frame( it needs a front piece still) as well as the top of the sink is nearly level with the top of the countertop and the washer/dryer. Making a seamless tabletop height across all of the side of the laundry room.

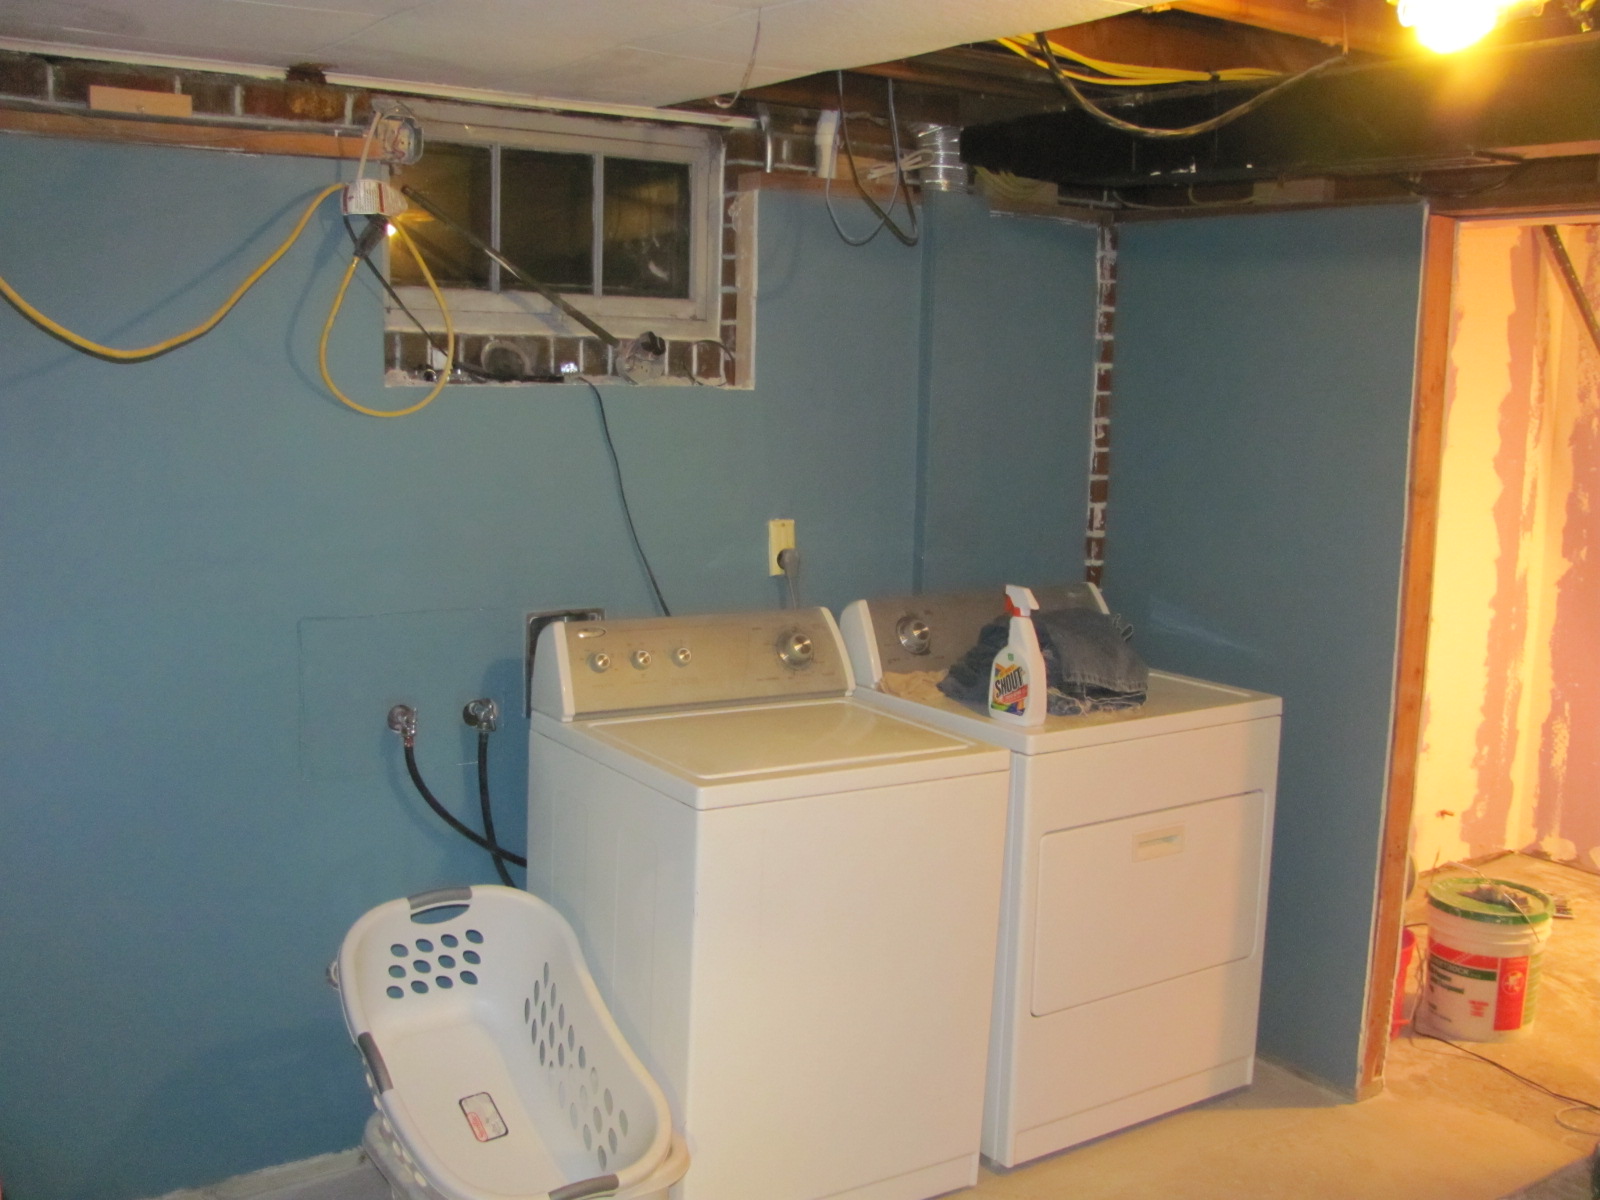
A staple that has been missing since day 5 after we bought the house was a shelf that we tore down in the laundry room, so it was about time that we got that back up. One of those simple shelving units that require a drill and a hammer to completely install.  I have never been a fan of the shelving parts and the weird clips , but as an overall system it is really good for people whom just want a shelf quick.  I got a level out and made sure that it actually leaned a little back toward the wall to prevent items from rolling off the shelf onto the washer/dryer

I quick one day trimmed out the window and cleaned it(wow what a difference) and that made a large difference  it’s amazing how much of a difference the small things in the room make a huge difference on making the room feel more complete.


When I was building the shelves for the laundry room, I had some leftover wood as well as we had a space in our basement bathroom that was akward and we thought should be filled. so we had a small peice of 1 dollar menards countertop laying around and we had some extra birch plywood left over. so I took some measurements and we made a small little towel holder that fit right in between the side of teh vainty and the wall.. and we made it just a bit hgigher than the basmeent vanity so it would serve as a good shelf for things. I think it is perfect for radios, my wife says its perfect for lamps.... I still think radios are better. We just used the same paint as we had used in the laundry room and it blended perfect with the rest of the room!

Also over the last few weeks we have been prepping for winter we used a lot of things from this site, for a few reasons. This site had more than the “top-10” it actually had 50, which is a really good number to cover things that you may or may not think of. In fact I learned a few things from other sites too, for instance, did you know that leaving the storm screens in  cuts like 10-15% of the sunlight coming in, and therefore dropping the temp that the sun warms the house.


We also have been noticing with it getting colder that the insulating we did in the basement is already doing its job. It is warmer down there than I recall it ever has been. I know it is early, but I am being optimistic about the house staying warmer this winter.

We got the gutters cleaned( which we will have to do again, planted perennials, cleaned the garage, tested the snowblower, mulched the lawn. All things that are good to make sure are up-to-par before the snow flys.

Speaking of which, Hopefully we can show you what else we have done before the snow does fly. Thanks for checking in on us!!

Monday, September 26, 2011

Fall has officially arrived, well at least it has felt like it over the last week or so… had a couple of nights that we(I had to) bring in the plants since it was going to get cold enough we could get spot frost in places and my wife was worried we would lose our tomatoes.  Not to mention my wife had broken her toe  so she was immobile  so I was doing the husbandly and wife-duties… ok, enough complaining.


The patio was used for a movie night, and all of the upgrades we had put in it worked great. I did get more done on the benches, in fact, we pretty much got one of the two done. Build painted and covered. All I basically did was built a box around a box then put a top on it.


While my wife and I were in the fabric store (on a 54% off day) and it was recommended to us to buy poly foam then wrap high-loft-batting around it to round corners off and make the seats not look so square on the cushion. Also another trick which my wife knew was when you are making a seat cushion is to put a type of vinyl or plastic under the actual pattern cloth that you want on top of the padding. This will create a barrier in case you ever spill a liquid on the seat, it won’t soak through and it will be easy to clean. We are still working on the other bench but need to figure out what we are going to do for the back of the bench style part….. we have the ottoman done.   Then over the next weekend when we had a bit of down time I tackled the bench part

The other part…as promised, was the suspended ceiling. Something that takes some practice to do or at least the general know-how of how to make it work. With ceilings unfortunately there are about 3-4 options, leave it empty and open, suspended ceiling, foam tiles, or Sheetrock. Based on what your application is will help decide which ceiling is right for you. Another thought to consider is  ceiling height, you will lose the most height with suspended ceiling; and the least with Sheetrock. First you need your supplies, for these there are many calculators out there that help you configure how many tiles/ runners/ cross tees you will need to complete your project, I would suggest using these as a good guideline for setting up the room. then it will give you an approx. amount of supplies that you will need to do a ceiling in that room… and you don’t necessarily need to buy everything at once( suspended ceiling ib by far the most expensive of the ceiling options (unless you do copper staple tiles) so buying the grid then waiting for a deal on tile is not a bad idea.

IF YOU DON:T WANT TO SEE HOW TO PUT UP A SUSPENDED CEILING>>>>SKIP THIS :)

Tools: laser level (ideal) or 2’ or 4’ level, string, screws 1 ¼ Philips  and 1 ¾ deck screws

First you will mount the wall  edge runner:

You will also want some of the runner hanging wire that is sold in stores, but don’t feel like you have to buy the special “hanging studs” you can get lags or even use 1.5” torques like I did. First you will want to hang the parameter of the ceiling, decide roughly how high you want the ceiling bottom to be and mark that spot with a pencil on the wall. Next you need to level that line all the way around the room(this is where a laser level is handy) or you can work your way around with a 4 and 2’ level occasionally measuring from either the ceiling or floor to make sure the height hasn’t wavered much. Once you have done that, you can check it by having t people(or nailing) a string across the room and checking that for level… adjusting accordingly. Once that is done go ahead and hang the outer border, using some flat screws(ones that don’t taper on the head preferably) and try to hit studs or at the least ever 16-20 inches around the edge. 


Now that your border is hung, you want to get the runners(big long ones) in place. Decided where you will want them by finding the center of your room and measuring a foot(or two if you are putting 4 x 2 tiles in the long way)  in each direction perpendicular to the joists. Then you will need to put something in the joists/ceiling to hang the wires from.  The more the merrier, but I went ever 32” (distance b/t 2 joists) you will need a row of wire every 4 feet, in line with where you are planning on installing your runners. Measure the distance from a wall to your mark that is 1’ or 2’ off center and then duplicate that line a few times on the joists.

Get your string out, and pull it tight to match up with the few lines you marked across the ceiling. Next you will hang the screws that will hold the wire up, put them at least 2” above the bottom the joist, so you can hangplenty of wire down with room to move. Once that is done, cut your wire into a length long enough to go beyond the “bottom” of your ceiling by at least 3” and then loop the top tight around the screw you just put in( I used a vise-grip and it worked great!) Now for the next part you will need to get your runners out.  Notice that there are many holes in the top, this is where the wires will go through to hang the ceiling up. The distance from the bottom of the runner to the hole is how much above the bottom of the ceiling the wires need to be bent. Run the string at this height along the wires you just hung, now you can go through and bend them all at a 90 deg angle at the height of the string. This creates a uniform height for the ceiling…. Repeat this every 4 feet the width of the room.

Once you have all the wire ready, time to hang grid!!!  Take your runners and figure out how much you need…. But the center of this needs to be the center of the center tile, and the  runners have notches in them every 2 feet for grid-work. That means you have to measure from 1’ or 2’ off center of the room then to your wall. Then from where the one runner stops measure that to the other wall… make sure you do it the same way for every runner otherwise your grid will not be aligned. Once you have your runner ready, take the string down if it is still up and with the help of people bring the first runner up and run the hanger wires through the holes. Then wind it up around the top of the runner a couple of times to keep it from coming loose.  Repeat this for the whole ceiling then get your 4’  tees out. Starting the the center put a 4’ tee in every 2’(if you are doing 4x2 tiles) or 4’( if you are doing 2x2 tiles) then if you are doing 2x2 tiles go back and put 4’ tees in the other direction(perpendicular) to the ones you just put in.  follow that up with the 2’ tees, placing them everywhere there is a 4x2 space to make it 2- 2x2 spaces.


The one thing I never did emphasis is that when you are done with your grid work, the edges should be equal on both sides since you hopefully centered the grid work and that means that as you are placing grid, you will need to trim. Just trim them long enough to set on-top of the l shape bracket so it just “runs” into the side ( the picture helps clarify it.)
Now all you have left to do is get your tiles and place them in, obviously there will be some trimming of the tiles involved unless for some reason you have an exactly even room that is 20x20…

Get your tile up, wire in some lights and ta-da… big upgrade to the look of your basement!

Tuesday, September 6, 2011

The patio has been our storage room for the last 11 months, and might I say....it was quite nice. Over time though, we were realizing that we could not continue to keep lumber and tools in a room that is nothing but glass and we finally didn't need the storage! Our three orders of business were for cleanliness, climate control, and comfort.

Step 1: Clean: We took the time to seal up everything on the floor. We are not sure how old the patio is or when it was installed, but we do know it settled about 1.5-2 inches total. This isn’t too much, however, it does means that things aren’t as square as it used to be. Caulk and expanding foam filler became our newest best friends. We went around the parameter of the inside with caulk to keep the weather out and the heat in. There was also an expansion joint between the house and the patio, and seeing that it would be a lot of caulk, we first topped it up with expanding foam up to 1” below the surface to keep critters out, then after a little drying time, we hit the top with some expansion joint caulk.

Flooring: Once we cleaned it, we could update the flooring.  After a variety of choices we came to the conclusion that it was tile or wood… vinyl that is. We thought this would be much safer outside tile in our changing climate and much more cost effective than refinished cement.  We haven't heard many people try this option, but are up for the challenge of being guinea pigs.  We took the time to lay it down and lay it well… making sure we weren’t cutting where we were not supposed to and measuring many times.  To keep the flooring down, we put quarter round surrounding the edge of the room. This sure changed the look of the room and created a good flow of style from the rest of the house.

Window: Remember the window we put into the bathroom? It was finally time to finish the other side. We patched up the opening by taking the temporary plywood off and replacing it with a couple pieces of (spendy) cedar siding, some primer and paint.   Only took a few hours to do it and now its like it was never a window…..sorta…  a bit hard to match 40 year old siding to new siding, but it is better than what it was before.


Step 2: Clean/Comfort: Now if you turn your attention to the lower part of the room, we had some wonderful Beaverdale brick circling the wall of the patio.  The brick was brown, dirty, full of spiderwebs and stray caulk/concrete mess and not attractive.  I thought it could easily use some color, so we went to Menards and got 3 shades of red in sample sizes ( 2 bucks a pop) and then added some color to the room. We found how me and my wife are different again with this project. After finishing she said she just painted random and "artsy"; I however counted the bricks per row, divided by three then painted that many +/- 1.  I guess that is engineer random…. and in my mind they look the same (even though mine took a little more touch up.)


Tabletop: For some reason an interesting "table top" like area was created in the wall of our patio.  Luckily we had a small piece of countertop that was the exact size and luckily one of my favorite things to do is framing (or not).  We bought a few pieces of unstained mitered moulding and framed it around the countertop, attached it to plywood, glued it all together, stained the top and created a serving area for the patio.

Table (and benches): We knew we had to have a table that could fit lots of people (my bride loves to have people for dinner). We found one on craigslist and a few chairs to go with it for $40.  Upon purchasing the table and chairs (and a rug), we decided to re-upholster the chairs.  This is actually pretty easy for dining chairs as there is usually a screw that holds the seat on the frame. Once the screw is out-the seat comes out, you remove the staples, measure and cut new fabric, re-staple and re-screw.  (Stay tuned for later post on how we made kitchen cabinets into benches to create more seating!)

Step 3: Climate Control:  We had to do a little rewiring to get a ceiling fan up.  I decided to add and move some outlets for more flexibility in the room and then added a ceiling fan.  The ceiling fan was a request from my bride and a superb idea as it keeps cool on those warm summer and autumn days. We hope to have a small space heater for the cooler days when we feel the need to use the extra space.  We painted the conduit to match the walls, so it's a little harder to notice and blends in well. In our last post we detailed the steps which extended into the patio.   


Curtains: My wife says every window needs to have a curtain.  She came up with this great idea for drop cloth curtains.  Apparently they are pretty easy since drop cloths come in a variety of sizes and already have finished edges.  They can also be dyed any color to match the room.  After sewing a place for the curtain rod, we used spray painted aluminum conduit for the rods and some eye bolts cut into hooks.  We pre-drilled the holes into the aluminum side of the patio, then used a vice to tighten the bolts.  To finish we simply tie the curtains back with ribbon or string when we want them open.

And that's enough for one post: Next time cabinets made into benches and our solution to laundry basket storage.

Monday, August 22, 2011

SON Where ya been???

Yeah we have heard it a few times from people where we have been and if our house has burned down becasue nobody has heard or seen what we have been doing.

Well in about late April or early May we decided to take a bit of a break from working on the house hard core and spend more time with friends and family and doing the summer things like being outside. Though we have been doing small touchup projects in the house and doing decorating as we have come across sales and garage sales.

What took up a majority of our time was a side project; over the last year we had talked with friends how we would like to drive Route 66(Chicago to LA) also as part of my personal bucket list, I wanted to repair a car,  so we combined the two. We bought a 1986 Mustang convertible for 1000 bucks and then stuck about 800-1000 in it then drove it there and back, so that  was where we were for part of the summer. The other reason that the house was ignored was that I was on buisness in another country, so you could say the house wasn't top prioirty...Oh anyone looking for a mustang convertible? ill give you a good deal :)


Now time to backpedal,  the last thing you saw is that we had just finished our basement bathroom and were taking a break for a while. So here we go, we tackled the bathroom some more and picked up decorations as well as some shelves to give it a more complete look....not to mention add funciton since we had quite a few guests over the summer.--One side tip for mirrors is that you don't nessesarily need a frame on the mirror A beveld edge mirror looks just great.  Or you can take an old picture frame and put that around it, thats work really good around a mirror; but also know that if a mirror sits in water too long the water will eat away at the reflection material on the backside of the mirror.


We also got the cabinet doors in the laundry room done so we a good amount of storage under the steps( also a great place for all of my work clothes!!!)


Upstairs we had a very special project we finally finished.... what is missing in this picture?????? that's right a giant hold in the wall.


We ran into a bit of a pinch in the late summer, we wanted a home where we would be able to host people and we had one room being used by a family member living here for the summer( who can also be accredited for helping us finish a lot of our projects) and we needed another bedroom, so we had to blitz and start and finish a bedroom in about 2 weeks and here are the results... sorry no build photos just finals. It did help we had all the materials we needed just laying around. Minus the suspended ceiling which wans't a cheap purchase.


The only other project that we have been hitting is trying to finish the tiling in the kitchen to the basement which was quite the task considering that i have never tiled stairs before, quite the learning curve.  We had to come to some creative solutions, but we are almost done, just have soune grouting to do, and everyone knows how fun that can be.


NEXT..... What we did to our Patio... now extra dining room....

Sunday, April 17, 2011

Basement bath 90%

It Is seemingly getting to a point where it is not so much me not updating the blog, but that SPRING has arrived and that means much less time indoors. This is a problem we knew would begin to happen and it seems that it reflects our progress in the basement. None-the-less lest see what we have done!
The laundry room is soo close to being done, its not even funny, we let the paint dry some more and I got the wiring back into place so we can have a code-friendly washing machine hook up I still have to hook the outlet up but for the most part that is all set.  We had a bunch of hooks laying around from the PO, and some old gas pipe that was just shoved up in the ceiling and I found a good use for them. I took them and FIRST asked my wife where she wanted them and put them and created hanging rods so we could get clothes hung up in the laundry when we don’t want them dried.
To polish up the look for the room, I got a hold of some 1x6’s and ripped them down the the right heights and put them above the wall we created, this way I can secure them up with 3-4 screws and they are totally removable in the event that the ceiling ever gets replaced or for some reason someone needs to get behind that. W plan on painting it all black to match the vent that is on the east side of the room, just to make it all flow better, or who knows, maybe we will go with blue.

The Big update since the last time, Was that we went from a non-functioning room with a shower in it to an entire bathroom!! We finished sanding down all of the walls, and then proceeded to use the same trick we had before of putting a slight texture on with a paint roller. Then once that was dried we could throw the first coat of paint up to give it some good color that really added to the room. The whole time planning the project, we were worried that the bathroom would not feel very big or flow nicely at all. And to be honest, it did think that painting that color would result in it feeling way too small. Once we had the first coat of paint up we then decided to try the part that I was uncertain about, Laying the floor.

I had never tried to cut vinyl or lay it and I was a bit nervous because I knew this was one of those one chance things. Similar to something I said about the carpet, you can always cut to big and trim… you can’t ever cut to small and glue pieces back on. I picked two walls and dill all of my measuring off ot them so that way I was having consistent numbers and wouldn’t have issues by measuring one point off two different numbers.
I took the time to draw out the floor plan mirrored (because I was going to cut thee vinyl from the backside) and took measurements every foot so I could cover any un-squareneses in the wall.

 
I made 1 cut at a time, in this case using dots that were on the back of the vinyl to help with cutting lines. I also cut a little big, which worked out well because I had hung the dry-wall ½” above the ground so then the floor slid right under it. After a couple of test fits and final trimming on the tight spots; I took the floor out and gave the concrete below it one final sweep and wipe down. After it had dried out I laid the floor for the final time, making sure that all of the edges were within ¼” of the wall (we are putting ¾” base all the way around so that helped too. and tried out the floor that I had used thin-set to make the floor flow…. Worked like a charm, could hardly tell it sloped and it was plenty smooth without bumps.

I then moved on to setting the vanity base in place and setting the toilet. The toilet was the run of the mill setting the toilet stuff. Hooked up the water supply line after going to the store to return the wrong one; remember there are differences b/t toilet supply lines and sink and the various sized fittings in between. Got that set and flowing like it should, then we officially had 2 functioning toilets again!!! As for the vanity, since we had the slope of the thin-set, I had to trim the bottom to level it up with the world. To do this on our 36” vanity, I took a 8” ¾” board and laid it on the ground and in 8” increments marked the slope so then I could be more accurate as to where the slope was. Next I cut the slope bit and the ¾” along the one side and then screwed it into the studs behind the Sheetrock. Once we got the vanity in, we set the top on, with some silicone and put our “new/used faucet on it. Tidied up the bathroom, swept and threw the outlets and light switches in and we almost had a bathroom.

The only other thing on our task list for that weekend was the ceiling,  It was the opposite of the floor, but just as fun to do. I wanted to do glass board, but at 35bucks a sheet, I wasn’t ready to fork that up for the glass board. Instead I opted for some panel board I believe works good on walls. It went up fairly well, very low profile so that helped for the lack of a high ceiling  in the room. For light I put a shower can light above the shower… that added tons of light and also we had the light above the mirror??? Or lack there of. We will get a after photo up once we get the trim up and a door on the bathroom 
 

Sunday, March 27, 2011

Breaking my rule... 2 posts in 1 night

Word of my wife... " you need to have the blog to where we are"

I guess that means that I have to get everyone all up to speed on where we are ACTUALLY at on the house. We had left you off after we had set the stud walls up in the laundry and had epox-ied the floor to look all nice and shiny. Since that happened a few weeks ago, here is where we are now :)

We had gotten all of the Sheetrock going up in the laundry room, as well as then we had the chance to get the washer and dryer out of the soon to be bathroom and back into the room they belong so that we would be able to set the walls in place for the bathroom. After looking back I realize I missed out on a lot of photos during this time, and I apologize for it, but once again, we were moving so quick, no time for photos!! I will throw up what I can find.

We got all of the walls that were not up from before, then we set to work getting the wiring done in the bathroom. We decided to put just a light above the vanity like normal, but then we wanted to add a spot of light in the shower so we wired a Shower-ready can light to go above it. Then we also ran some 12 gauge wire for the vent fan that was to go int eh bathroom and made sure there was room in the ceiling for the heat vent that we would wrap up and around to add some good heat into to room.


Once the wiring was all set up we then got the rock up and put a good coat of mud to it all to smooth it out. Tomorrow nights project will defiantly be sanding a ton of mud off the walls. But the real problem child was the floor, we ran into a challenge here with the varying heights of different things in the bathroom. Due to miscommunication b/t me and my father, the toilet flange was 1/2 too high in preparation for Tile that we were not going to lay; as well as the shower was leveled using a build-up method instead of a traditional "cut the bottom of the shower" method.  To combat this part, I had to be creative. I wanted to use Self-leveling cement to furr it all out and make a smooth transition for it. However, it does what it says.. self levels... so since quick-crete was too rocky I decided to use Thin-set... which I would say worked pretty well. From where the toilet flange is was a 1/2" high and the shower had a 0-3/4" slope on the pad beneath it. To top it all off, the whole bathroom has a slope of 1" every 4 feet so I had to fight all of those. But after it was all said and done, hopefully the vinyl floor will lay beautifully over top it. Most likely that will be decided in a week.


Part II of our most recent weekend was the "almost finish" of the Laundry room. we got all of the sanding and smoothing done of the laundry room, then we noticed that we had some discrepancies in the wall (this was because we were trying to use all of our scrap Sheetrock on one wall so it made for lots of tape seams. So what we did, is we took some drywall mud and watering it down to almost paint consistency and then rolling it on with the most aggressive roller we could find.

Once that was rolled on it made a nice "texture" and that was really good for covering small rough spots in the wall; then once we used a similar roller for the paint, we then made a pretty textured surface for the walls which gave it a much more complete look for the room. We also did some small work-arounds to make things accessible and/ more finished. The dryer vent is in a boxed in space behind the dryer that makes the tube not such an eye-sore. We also installed some plywood in places where access may be needed (pipes and shut-off valves) then sheet rocked around the rest.. After some paint, and some re-hooking most everything up need one more outlet to be installed  for the wash machine; and a light, then we should be set on the laundry.

About Me

Living Our Lives in a Central Iowa City We have been married over a year and carrying on an adventure of crazy life with each other and documenting the chaos along the way