Sunday, March 27, 2011

Breaking my rule... 2 posts in 1 night

Word of my wife... " you need to have the blog to where we are"

I guess that means that I have to get everyone all up to speed on where we are ACTUALLY at on the house. We had left you off after we had set the stud walls up in the laundry and had epox-ied the floor to look all nice and shiny. Since that happened a few weeks ago, here is where we are now :)

We had gotten all of the Sheetrock going up in the laundry room, as well as then we had the chance to get the washer and dryer out of the soon to be bathroom and back into the room they belong so that we would be able to set the walls in place for the bathroom. After looking back I realize I missed out on a lot of photos during this time, and I apologize for it, but once again, we were moving so quick, no time for photos!! I will throw up what I can find.

We got all of the walls that were not up from before, then we set to work getting the wiring done in the bathroom. We decided to put just a light above the vanity like normal, but then we wanted to add a spot of light in the shower so we wired a Shower-ready can light to go above it. Then we also ran some 12 gauge wire for the vent fan that was to go int eh bathroom and made sure there was room in the ceiling for the heat vent that we would wrap up and around to add some good heat into to room.


Once the wiring was all set up we then got the rock up and put a good coat of mud to it all to smooth it out. Tomorrow nights project will defiantly be sanding a ton of mud off the walls. But the real problem child was the floor, we ran into a challenge here with the varying heights of different things in the bathroom. Due to miscommunication b/t me and my father, the toilet flange was 1/2 too high in preparation for Tile that we were not going to lay; as well as the shower was leveled using a build-up method instead of a traditional "cut the bottom of the shower" method.  To combat this part, I had to be creative. I wanted to use Self-leveling cement to furr it all out and make a smooth transition for it. However, it does what it says.. self levels... so since quick-crete was too rocky I decided to use Thin-set... which I would say worked pretty well. From where the toilet flange is was a 1/2" high and the shower had a 0-3/4" slope on the pad beneath it. To top it all off, the whole bathroom has a slope of 1" every 4 feet so I had to fight all of those. But after it was all said and done, hopefully the vinyl floor will lay beautifully over top it. Most likely that will be decided in a week.


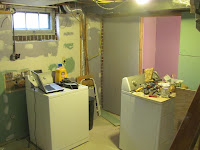
Part II of our most recent weekend was the "almost finish" of the Laundry room. we got all of the sanding and smoothing done of the laundry room, then we noticed that we had some discrepancies in the wall (this was because we were trying to use all of our scrap Sheetrock on one wall so it made for lots of tape seams. So what we did, is we took some drywall mud and watering it down to almost paint consistency and then rolling it on with the most aggressive roller we could find.

Once that was rolled on it made a nice "texture" and that was really good for covering small rough spots in the wall; then once we used a similar roller for the paint, we then made a pretty textured surface for the walls which gave it a much more complete look for the room. We also did some small work-arounds to make things accessible and/ more finished. The dryer vent is in a boxed in space behind the dryer that makes the tube not such an eye-sore. We also installed some plywood in places where access may be needed (pipes and shut-off valves) then sheet rocked around the rest.. After some paint, and some re-hooking most everything up need one more outlet to be installed  for the wash machine; and a light, then we should be set on the laundry.

No back peddling here, but here's the story

We have been working burning the weekend oil, and the night oil, and the emergency supply oil. Trying to get the whole house done on the inside before it gets to be nice outside and we feel that we need to be out there all the time.

The big things over the past while have been the floors and the walls getting more patched up in the laundry room and ready for finishing. We can jump to the floors, when it comes to basements you really want the most durable floor that you can have, especially if you are in an area that is prone to any sort of water in the basement. We really wanted to do this " durable concrete" that was a thin layer of concrete that would coat the floor really smooth and waterproof, but they wanted $1500.00 min to do the area for our basement bath and laundry. So we decided to fore-go it and do the rustoleum epoxy for floors ad I have to say, it is like people say... prep is 90% of result. we took the time to strip the floor as good as we could then wiped it all down with mineral spirits.


After making sure that we had the floor completely 100% clean and prepped, we could then put the 2 part epoxy down. word of the wise, split is and mix only half if you are uncertain of the amount of space, it could cover more than you thought.... I only saved about 2 cups of it so i could touch it up later, and the leftover I ended up quickly cleaning the back "tool room" and laying down the remainder of the epoxy in the back. Boy that made for a really clean room!!! After the floor had dried enough, we got to start on the next part of the project, that was getting walls set up  for some Sheetrock and electrical in the laundry room. This was going to really change the look of the room but not near as much as when we get it finished.


on the wall that divides the office and the laundry, we first took the time to make a small "stub" wall that would keep any water in the laundry room and it also gave us something to build a dividing wall on. We also found a good use of scrap 2x4.. since this wasn't a load bearing wall, we decided that we could piece together studs so that we could finish up that wall in between. Not a perfect solution, but it worked pretty good.


Then on the other wall, we had a maze of drain pipes, supply lines and electrical, and not to mention a window so we had to find a way to snake all of our studs on the right spacing and  have enough support to get the Sheetrock in-place without skipping out on support. I ended up running some new lines for the washing machine just to get it closer to where it was needed and left a cold supply line in case we decide to put a water softener in. That way we are prepared if we decided to upgrade from our city water in the future.

Once we got the studs in place and then stared on the Sheetrock I had some help from friends and my wife; Which if you recall a while back I highly suggested that you have help when hanging Sheetrock. Also, not sure if I have photos of it, but we decided to insulate between the laundry and office because then it would drown out the noise of the washer and dryer just a bit. that and if we make it a bedroom, than it is quiet enough that a person could sleep when they are in there.

Sunday, March 6, 2011

Begining of the Basement bath...what a mess

Well, After what has all happened this week, I can definitely say that I believe that my fathers hate for plumbing has genetically passed on. But regardlessof that fact, 90% of all plumbing for the basement bathroom is now complete. Where we had left off last week was that we had begun to start laying out the bathroom walls after dry locking them. Since then, we have plumbed to shower drain, then re-plumbed the shower drain  & ran all of the lines that feed water into the bathroom and shower... here is where we are at: 
 
We got the framing done, after than usally follows electrical, but since we were doing all of the electrical in the wall that hasn't been placed yet (the wall b/t the laundry room and the bath that we are leaivng out so we can coat the floor in the laundry room)we will actually be doing the electrical a little bit later. However for the remaining walls we insulated and got the vapor barrier up. Even around the shower got vapor barrier around it. This way we can keep any unnecessary moisture at bay.

Going back to the plumbing that I was talking about earlier; we had taken the time to send the shower drain pipe off our our main sewer line "redux" and then when I was ready we would begin to plumb in the shower. Well the first time we went to set-up the drain, we had two issues. One: the drain pipe was a whopping 3/4" over further than it should have been. Two, the bottom pipe of the Trap we had set up did not set with the PVC glue. So I had the privilege to dig up some of the previous faulty plumbing to make it right. Once it was all in I was able to test fit the bottom part of the 3-piece shower and then see how everything will line up...which is very very important when the shower assembled gives us 2" up top to play with for installation.


One of my wife's side projects was a creative use of the space below the stairs which i have to say is a really creative idea. We had found some cabinets on the side of the road i think 2 days after we signed for the house( and we shoved them in our 2 bedroom apt) but we were able to adapt one of the them to the shape and angle of the stairs, as well as use it to be built off of to create more storage space in the laundry room.


On an additional side note.. useful storage is better than 1950's era varnished wood paneling which we are in the process of trying to eliminate anywhere in the basement. A change of color was the most we could do for it in certain places,  so we are going through the last part of the basement and priming the varnished pine and going to transform the colors to try to update them just a little bit...more photos to come later.


Back to the Shower and bath; I had a joyful time getting all of the copper pipping run to the appropriate places for the shower and the vanity. The bathroom is on one far end of the house,  so when I had to shut the water off it took quite some time to drain the water out before I could make proper soldering connections that would not leak. After running back and forth turning the water on and off, I finally got all of the connections leak free...however I always sleep light the night after new plumbing or electric thinking every stray noise is something I have done going catastrophically wrong..still have been doing well.


 For the shower, with it being a 3-piece it provided some smaller challenges. As I stated earlier..the ceiling in our bathroom was 82" high and we managed to only find 1 shower that would fit down our stairs and give us the size we wanted....but would be really tight at a height of 80". We pre-fit and drilled holes for the shower heads (yes... 2 heads...we figured why not?) before putting the whole shower together that way we would not chance wreaking the base of the shower from moving it so much. Another thing that we seemed to come across was the same problem we had in other places of our basement of the floor sloping. We were able to combat that by using some concrete and creating a level pad for the shower to set on. This includes a smaller set of pads in the back of the shower to support the "feet" in the back of the shower that hold the back half of the shower up and level. As you can see in the Left hand photo below.

 When it came time to set the shower we first assembled the 3-piece shower to the way that it was when we bought it. Being careful not to scratch it as we placed in place, and had to utilize some extra help to make sure that it went into place. One other thing that we did to assure the firmness of the shower was to mix up a bag of sack-crete and pour it around what would be the bottom of the shower, to assure that the floor didn't feel like it was falling in when you took a shower. I apologize for the lack of photos of the shower install; but it was a situation where we were under a time crunch and it was crucial that we focus on getting the shower in right and did not think to take many pictures except for after the fact.  Thanks for looking and we will keep you updated as our last few parts of our projects come into place.

About Me

Living Our Lives in a Central Iowa City We have been married over a year and carrying on an adventure of crazy life with each other and documenting the chaos along the way